Bellows construction

After a multitude of requests I am finally putting up a brief how-to on making single action bellows. This is more of a general guide than a step-by-step, however you can scale it up and down to suit your needs. It is assumed if you're at the point of wanting period bellows that you have tools for basic woodworking and metalworking, and that you know how to use them, so I will not go into great depth on actual construction techniques.
If you take a look at the Images Of Medieval Bellows page you'll see that they come in all shapes and sizes, so don't take this to be the only way, shape, or size to do them.
The size given here should work fine for the small crucible hearths (the one in the image above is actually too big). There is no good rule for sizing because it depends on several factors, however it is better to have a little more air available than too little. The actual amount of air you pump into your hearth is largely regulated by visual (what color is the fire) and audio (do I have a good dull roar or is it a hissing sound) clues which you will gain through experience.A nice set of bellows is not a beginners project, however it should be well within the reach of most crafty folks. Last time I calculated everything it, it cost me about $50 and between 40 and 50 hours to construct a set.
To calculate the volume of air your bellows will move, use my Bellows Volume Calculator.
Layout and dimensions
Here is a good, simple layout of traditional design. I like the rounded back better than square because it looks nice and it's easier to attach the leather. Cutting the handle in one piece with the body may waste a tad bit of wood but it's much easier than attaching one. Here are some *suggested* dimensions:
A - 20"
B - 8"
C - fit to your hand
D - 3"
E - 1 1/2" hole
F - 1"
G - Upper Board
H - Nozzel Upper Piece
I - Lower Board
You can also put the inlet valve on the bottom. About half the medieval images of double bellows show no valve on the top. A few show double top valves.
Note that this is for a single bellows. For a set of double bellows (which you will need for casting or forge work) you need to make 2 of these.
Layout
Standard 3/4" pine boards from the hardware store that are relativly knot free work well for these bellows. You will need an upper and lower board. You can get creative with the layout to maximize wood use, but it's easiest to buy a board roughly the same width as B and at least as long as A + A + C plus a few inches. To lay out your pattern, you can start by ripping your board to C plus a bit, establishing a center line, then lay it out using a large compass and square. Cut this out with a jigsaw and clean up with a spokeshave, sander, or similar. Use a hole-saw for the air inlet. If you dont have a large hole saw, use 1" spade bits and make two air inlets.
Make sure you mark but dont cut the nozzel piece at this time. Clamp the two boards in a vice on top of one another and spokeshave (rasp, whatever) them down to the same size.
Cut the nozzel upper
Now cut the nozzel upper portion from the upper board at roughly a 45 degree angle, using the line you drew in layout for a guide. The result is a lip formed between the upper board and the nozzel which acts as a hinge for the upper board so the stress of pulling apart is there instead of solely on you leather. Alternately you can put a radius on the edge of the upper board and a matching cove in the nozzel, making a smooth hinge or knuckle joint, but this is a bit more advanced.
Attach nozze
Glue and nail the nozzel tip upper to the lower board. Predrill holes for the nails so you dont split the wood. Make sure you nails will not interfer with the air channel that you will drill. Leave about an inch at A with no nails. We will shape this part next.Drill the air inlet hole through the center of the nozzel as shown, with a 1/2" bit, protruding past the nozzel assembly about 2". Clamp the upper board in place and drill into it at the same time as well.
Front valve
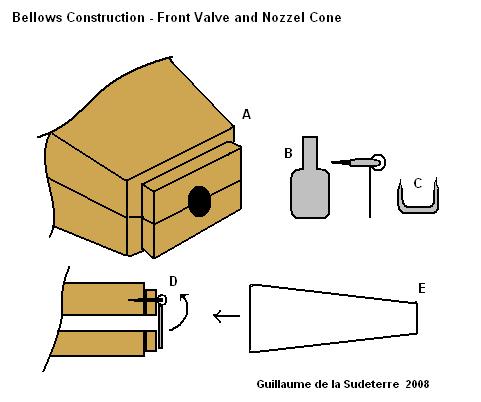
A front check valve, while not absolutely necessary, helps with the efficiency of your bellows. The "exploding bellows" syndrome, which a checkvalve is supposed to prevent, does not really apply to single action bellows. It is a slighly more complicated step but generally worth it. There are several ways of doing this, however this one is fairly simple. - A step is made in the nozzel A about a quarter of an inch long and just deep enough to accomodate your sheetmetal nozzel (like 1/16")
- A small metal flap is constructed as shown, the top tab curled into a tube
- A large metal staple C is then used to attach the flap to the front of the nozzel, covering the hole and allowing the flap to rotate freely
- a sheet metal cone E is then constructed to fit over the assembly, resting in the recess made in the nozzel
Alternately, the cone can be round and the nozzel shaped and stepped accordingly, however you may have to round off the front of the nozzel and create a rounded flap which will not bind in the round cone. I will try to get pictures of this later, as it's much easier shown than explained.Theophilous does mention this front valve, however he does so in the section on organ bellows construction, not in the casting or smithing sections.
Front valve image
Here is a shot of the front valve. As you can see, it is a simple yet effective measure.
Inlet valve
There are several types of inlet valve styles. Style A has the advantage of being easy to make, however it does not work as efficient as style B because it doesnt open very well. Construction of A should be fairly self explainatory. Construction of B is as follows.- Using a piece of fairly thin leather, cut out a rectangle about 1/2" wider than your inlet hole, and about twice as long
- On top of this, glue a thin (< 1/8" thick) piece of wood as shown. Clamp flat till dry
- Cut a thin strap in the front as show
- Nail this flap over your inlet hole, on the inside of your upper board
- Nail the end of the strap in such a way that it keeps the valve from flopping too far open (about 30 degrees)
Fitting the leather
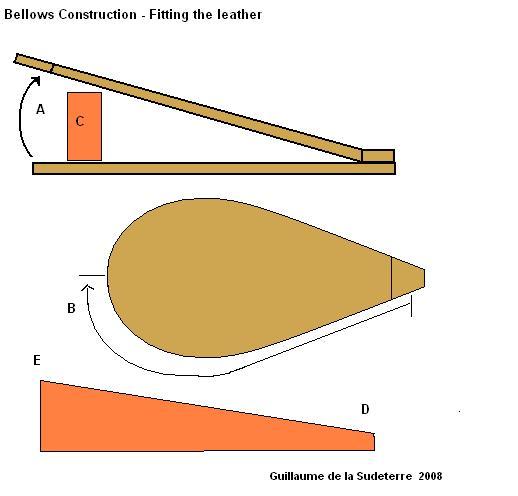
The best material for the sides of the bellows is a thin leather, however a tight canvas will also work just fine. The easiest way to fit the leather is to make a paper pattern by tapeing the boards together at the nozzel joint and proping them open with an object C about 30 to 40 degrees at A. You can build them so they open much wider but this will involve building hoops to support the leather so it doesn't billow out.Take a piece of paper as wide as A + the thickness of both boards and as long as B + 1". Tape this in spots along the path B and with a marker draw a line where the paper intersects the top of the upper board. Cut along this line and the resulting pattern should look similar to D. Leave about 1/2" or more excess at E for stitching up the back.
Lable one side of your pattern A and the other B. Trace out the pattern on your leather, once with A up, once with B up. Cut this out.
The reason we do this in 2 parts is that it's easier to find leather in shorter pieces, and more importantly it is helpful to leave a stitched seam in the back of the bellows so if you ever need to work on the valve you dont have to disassemble the entire thing.
Attaching the leather
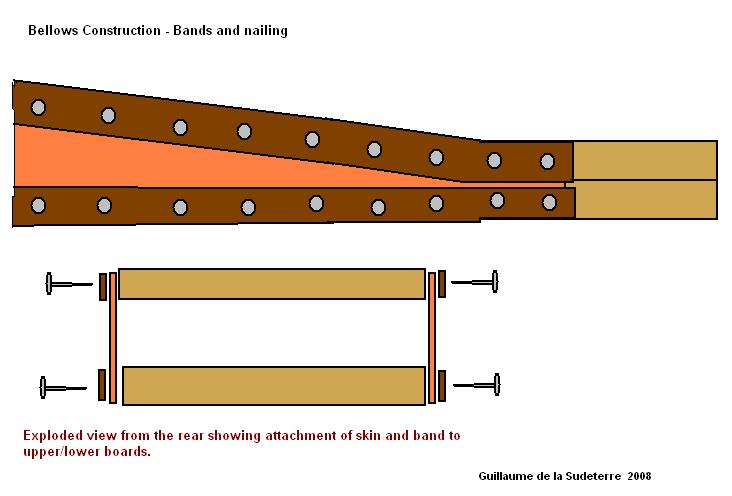
There are 2 ways to attach the leather to the bellows. Traditionally one would use small nails or tacks in conjunction with an additional strip of leather around the boards. Evidence of this can be seen in manuscripts.
Another method is to stitch the leather to the boards by creating a series of diagonal holes from the edge of the board up through the top. While this seems like a lot of work, it is fairly easy to do with drill or gimlet, and it precludes the use of a great number of nails which, medievally speaking, would be quite labor intensive. Additionally, the use of stitching to join wood is well documented in the production of small Viking boxes, so it is not completely out of reason.If you are going to nail your leather on, I would suggest flat headed, black, cut tacks about 1" long or more. Don't use the big brass-headed upholstry tacks, as this, quite frankly, looks rather silly (we're not making a circa 1970's couch here).
Cut strips of leather the same width as the thickness of your boards, enough to run the perimeter of both boards. Space the nails about 1" or less apart. Start with the bottom board, and start your leather about 1" in front of the nozzel joint. When you get the to seam in the back, overlap the join about 1/2". We'll sew that up later. Leave the nozzel joint taped together as you complete the uppper board. Cut off any excess.
Hinge and nozzel cap assembly
The leather hinge and nozzel cap covers the hinge joint and keeps it from seperating. Since we created an angled "hinge" with the upper board and the nozzel, this cap should not take the stress of opening and closing each time and should therefore not pop it's nails out, as happens when you don't create a wooden hinge. It simply holds the upper board in place and helps seal the joint from air leaks. Study the illustration for an idea of how to pattern this cover, and make a paper pattern first by wrapping it around the nozzel. Stitch the 2 flaps together at A.
Alternately you can wait until you construct the sheet metal nozzel and put this cap on after you afix it, to cover the joint.
Seam detail
Trim and stitch up the back seam. Note that you need to run the leather under the handle, but stop the reinforcement strips at the handle. Alternately you can get fancy and cut out a slot in the leather for the handle.
Square nozzed tip
Admittedly, the square nozzel can be a bit of a challenge for those not familiar with sheet metal work. There are formulas and angles that can be calculated to give you just the right pattern, however the easiest thing to do is get a rough idea, make a cardbord pattern, and trim to fit with trial and error. The critical dimentions are - A, the width of the nozzel
- B, the heigth of the nozzel
- D tip opening, which is about 3/8"
- E seam or tab width, about 1/8" to 1/4" depending on how you want to seal the seam
- F, the length of the nozzel tip
The seam can be closed by soldering or by forming a mechanical joint. Consult a book on sheetmetal work if you are not sure how to do this.
The end of the tip can be gently formed round by tapping it with a mandrel inside. Secure the nozzel tip to the wooden nozzel by pre drilling holes in the sheet metal and nailing it. Be mindful of the air hole and the flap. Make sure the flap has plenty of room inside the nozzel tip to do its job.
Round nozzel tip
Alternativly a round or cone shaped nozzel tip can be made. Forma rounded nipple on the end of the wooden nozzel instead of a square one and construct an cone with interlocking tabs as shown.
Be sure to leave enough room for the flap of the backflow valve to operate. Drill nail holes in the sheet metal and nail the tip to the nozzel.
Supports
Supports that tie the two bellows together are useful because it helps keep them ridged and give you something to stake down so they dont move while pumping. I prefer small boards about 1"x3" with holes in the ends for staking. These should protrude past the bellows on each side by a few inches, and there should be 2 or 3 inches between the bellows so they don't hit one another in operation.
These can be screwed on from the bottom so as to be unobtrusive, however more period approaches can be devised with some imagination.
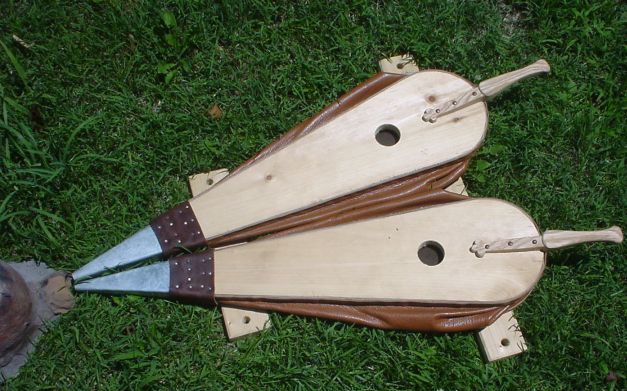
At this point you should have a fully operational set of double bellows. I usually stake mine down when in use. For finishing I would highly recommend linseed oil and wax. No point in doing a high finish because after some use they will become pitted and scarred from sparks and "fire fleas" landing on them. I have found this design to be very versital. They have been used in the drizzeling rain more than once with no ill effect, and owing to the wooden hinge arrangement I have not had problems with the hinge area coming apart like other bellows.
I will try to improve these plans eventually as I think of more things, however this should get you started in the right direction. If you find these useful, let me know and send me pics of your bellows so I can post them here.