Making an Anglo-Saxon saucer brooch
I've been wanting to make an Anglo-Saxon disc brooch for some time and have been researching how they may have been manufactured. There are apparently several ways they were done, the predominant ways being a rounded 'saucer' beaten out of sheet with a repoussee insert or casting, either in a piece mould or lost wax. Within the cast category it is evident that some were carved from wood and some were carved in wax. You can see this by the way the decoration was carved. Chip carving in wood lends itself to V shaped cuts and more angular designs, while wax tends to be (or can be) much more fluid. Examples have also been found with a wood-grain pattern showing on the finished casting, indicating that at some point the primary model was wooden.
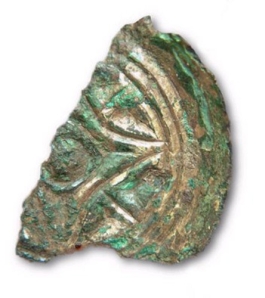
I plan here to test a few theories about how these were made by doing a few reconstructive experiments using what I hope would be methods available to an Anglo-Saxons in the 5th-7th centuries. My first attempt will be to duplicate one based on a fragment I found while searching through the Portable Antiquities website. Because of the angle of the cuts and the layout, I feel that this was most probably chip carved from wood. The first question is how do you get the initial 'saucer' shape? After looking at many pictures of these (including cross sections), I don't believe they were cast flat and the rim turned up, but rather cast with the rim in place. The best method for making a model like this to me would be turning on a lathe. A small primitive lathe should be able to turn a little saucer blank like this with no problem. I made up a small blank in maple.
Carved Model
After turning out the blank, I proceeded to carve the pattern. Now, I'm no Wayne Barton when it comes to chip carving, but I can get the point across, so to speak, and results came out surprisingly close to the original. The angles are the same, the depth of cut is the same, overall effect very good, etc.
So here is the model. This was not overly difficult to do and took maybe 1.5 hours, excluding finding a good original and a brief stop to eat and do the dishes so my wife doesn't complain about me spending all my time dinking around in the garage.
Making the mould (lower half)
Here we have the first half of the clay laid down, about 1/8" - 1/4" thick, slightly domed at the lower center. This is tempered clay -- a mixture of clay, sand, and organic material in equal parts. I'll have more on this in another article.
Slipping the lower half
Now we slip the face with fine clay so we can capture the best detail. Let this dry to the point it is no longer sticky to the touch (about 15 minutes perhaps).
Press the model into mould
Here we've pressed the model into the mould, after first dusting the mould with parting compound (talc). For this particular model, I've pressed it down face first so it fills up the hollow of the saucer, then I pressed the edges of the mould back down to the level of the saucer rim. Otherwise I wouldnt be able to draw the model back out, since the clay would be over the angled rim of the saucer.
At this point I noticed a small problem unique to this model -- there is no reference point that I can realign the model if it comes up. Unlike, say, a penannular brooch where its obvious which way it goes, theres no good way to realign this because it all looks the same from the back. So I'll have to be careful and not dislodge it until I'm ready.
Note the keying marks and the sprue channel. The channel was shaped with a wooded former.
Upper half of the mold
After the first half is leather hard (hard enough that it won't distort while I work on the upper half) we can dust the lower half with parting compound and press on the upper half of the mould, making sure no voids are left around the model and that the keys are filled too. This is left to dry for 4 or more hours (depending on humidity) until it too is leather hard. See again the sprue former in place. You may be tempted to add small eyes and teeth to the upper mould half, completing the illusion that this is a small animal eating your sprue former. You should probably resist that urge.
Remove the model
When the 2 halves are dry enough to be seperated without distorting, we can part them and carefully remove the model. I use a small scribe (sometimes 2) to pop the model out. Tweezers are also handy. Try not to tilt the model too much as its coming out or you will distort the mould.
At this point in our story, I confess forgot to press in the form for the pin and its catch into the back of the model. I do this with a thin sliver of wood much like a popsicle stick. For this one, then, I'll have to solder them on afterwards. Both methods are period.
It was here I discovered the first problem. The water from the mould soaked into the wooden model and it warped slightly. This could present a serious problem because now the casting will come out warped. The model straightened out when it dried, so now the question is how to seal it up so this doesn't happen again. I may try soaking it in molten wax and clamping it flat to cool and see if that makes it impermeable to water.
He slips, he scores...
Now we lightly score the 2 mould halves and slip them. I don't know if scoring is needed or not. I havent seen it on period pieces, however I know potters do it when they lute 2 pices together, and this is essentially what we're doing.
Slip
Slip the joint, but don't get it too close to the model cavity and don't get so much that it will squeeze into the model cavity when it's pressed together.
Join the halves
Make sure the sprue hole is clear and adequately sized and placed. It should be about the size of a pencil and placed in a spot where it can be easily cut and finished off. If not, it can be modified slightly with a dowel (or a pencil).
Now we carefully assemble the 2 halves, making sure the keying marks are registered properly. You must be careful at this point not to press too hard and collapse the model. Once the edges are wet and the clay has softened, run a spoon back (or your thumbnail) across it and turn the top edge over the bottom, blending the 2 together in the process. This creates somewhat of a mechanical join that is less likely to split back open when we fire it.
And now we wait...
At this point we've done all the damage we can to the mould and theres nothing to do now but wait till it drys. This can be anywhere from 2 days to a week, depending on the humidity. I've tried to rush it and it just cracks the moulds, so its better to wait it out. I like putting them on a wire drying rack so at least the air can circulate around them and hopefully they'll dry more evenly.
On the shelf under the drying rack, you can see more wooden moulds. These are for pressing into clay to make wax models out of. The little copper stand is for melting wax over an oil lamp
And here we have it
After baking the mould for 2 hours at around 1100 deg F, the metal was poured in and the mould was cracked open. I cast it in an alloy I made of CU69 ZN25 PB6, chosen for its good flow characteristics, as well as the fact that it was an alloy that happened to be used historically. The fired mould looks just like those dug up from Helgo and Dunadd.
The cast saucer brooch
Close up showing detail, compared with the original on the right. The surface texture is a bit rough and I think a thicker layer of fine clay next to the model would give a better finish. It did work fairly well though. One thing that is immediately noticable is the amount the mould shrinks from the original. This can be controlled somewhat by using ground pre-fired clay as the refractory. This would also give a finer finish than the sand. I plan on trying this later.
The next phase will be cleaning up the flashing, soldering on the pin hinge and catch, and burnishing it.
The handout that was used in my casting class that includes the information on this article is here.